Showing posts with label Blogger. Show all posts

Friday, 27 January 2017

How to add Stylish Bootstrap Buttons to Blog

Mujhe bohat sare questions ate hain ki , Ap kaise apne Blog me Buttons add karte hain? Actually ap Is blog main jo buttons dekhte hain wo is template ke sath tha . To main ap sabka help nehi kar pata tha. To ham apkeliye a kuch buttons design kiya hian Jisko ap apne blog me badi asani se use karsakte hain. Ap ko agar Coding pata hain to ap jante hi honge Bootstrap ke bare main. Agar pata nehi to  Chaliye main bata deta hu: Bootstrap ek HTML,CSS,JavaScript ka frame work hain jiske jariye bohat asani se ham log Website Design karsakte hain. In sare buttons ko hamne bootstrap ki madat se banya hian. In buttons ko use karneke liye apke blog me bootstrap ko installed hona jaruri hain. Umeed hain ki ap is post ko padh kea ap asani se apne blog me buttons ko add karsakte hain.

How to add Stylish Bootstrap Buttons to Blog

How to add Bootstrap in Blogger blog ?

Jaise ki maine apse phelehi kaha tha nki in buttons ko use karneke liye apne blog me Bootstrap installed hona jaruri hain. Is liye apko Bootstrap ko add karna padega Bootstrap Basically do tarikese add hota hain ek ap uska pura source ko apne hosting me add karsakte hain or dusra ap XDN ke jariye Bootstrap ko apne blog me add karsakte hain. But Blogspot me apko Hosting nehi milti hain isliye apko CDN hi use karna padega. Uskeliye ap niche digaye Steps ko follow kare.
(Related: Add Uniqe Search box widgets to Blogger blog)

Steps : How to add bootstrap to Blogger blog

How to add Stylish Bootstrap Buttons to Blog

Step 1: Go to bootstrap official website By Clicking here.
Step 2:  Copy the CDN bootstrap code.
Step 3: Go to Your Blogspot dashbord >> Template >> Edit template >>  Ab Ctrl+f  Press karke </head> Tag ko find kare or uske phele us code ko paste karde. 
Step 4: Now save the Template.

Stylish Buttons Designed for blogger

Hamne Bottstrap ke Buttons ko aur thoda style Diya hian CSS ki madat se to Agarv ap insare Styles ko use karna chate hain to ap Niche digaye CSS code ko blog me add karle Uskeliye Ap niche Digaye Steps ko follow kare:

How to add Stylish Bootstrap Buttons to Blog

  • First of all Go to blogger dashboard  >> Template>> Edit template >>
  • Find  ]]></b:skin>  Is tag se phele Niche digaye Buttons ke css code ko add karke Save par click kare.
.btn{  border-radius: 20px;  margin-bottom: 5px;  -webkit-transition: all 0.5s; -o-transition: all 0.5s; transition: all 0.5s;}.btn:hover{border-radius: 0px;-webkit-transition:0.5s; -o-transition:0.5s; transition:0.5s
}

Add Bootstrap Buttons to blogger blog


So friends a ab ham Important step par a cheke hain ahase apko serf in shot code ko copy karke apke post me add karna hain or #  ki jaga apka link dena hain. ðŸ˜ƒ
(Related: Add Sliding Realated post Widgets to Blogspot Blog)

Bootstrap Buttons for blogger Style 1

How to add Stylish Bootstrap Buttons to Blog
Demo Button
<a href="#" class="btn btn-primary btn-primary"><span class="glyphicon glyphicon-eye-open"></span> Demo</a>
Download Button
<a href="#" class="btn btn-primary btn-primary"><span class="glyphicon glyphicon-download-alt"></span> Download</a>
Visit Button
<a href="#" class="btn btn-primary btn-primary"><span class="glyphicon glyphicon-new-window"></span> Visit</a>

Bootstrap Button Style 2

How to add Stylish Bootstrap Buttons to Blog
Demo Button
<a href="#" class="btn btn-success btn-primary"><span class="glyphicon glyphicon-eye-open"></span> Demo</a>
Download Button
<a href="#" class="btn btn-success btn-primary"><span class="glyphicon glyphicon-download-alt"></span> Download</a>
Visit Button
<a href="#" class="btn btn-success btn-primary"><span class="glyphicon glyphicon-new-window"></span> Visit</a>

Bootstrap Button Style 3

How to add Stylish Bootstrap Buttons to Blog
Demo Button
<a href="#" class="btn btn-danger btn-primary"><span class="glyphicon glyphicon-eye-open"></span> Demo</a>
Download Button
<a href="#" class="btn btn-danger btn-primary"><span class="glyphicon glyphicon-download-alt"></span> Download</a>
Visit Button
<a href="#" class="btn btn-danger btn-primary"><span class="glyphicon glyphicon-new-window"></span> Visit</a>

Bootstrap Button Style 4

How to add Stylish Bootstrap Buttons to Blog
Demo Button
<a href="#" class="btn btn-info btn-primary"><span class="glyphicon glyphicon-eye-open"></span> Demo</a>
Download Button
<a href="#" class="btn btn-info btn-primary"><span class="glyphicon glyphicon-download-alt"></span> Download</a>
Visit Button
<a href="#" class="btn btn-info btn-primary"><span class="glyphicon glyphicon-new-window"></span> Visit</a>

Bootstrap Buttons ko blog me use karneka tarika:

Sabse phele IS tutorial ke according bootstrap ko apne blog me add kare the uske bad Css code add kare.Bas template main apko itna hi karna hain. Abu par dig aye shots code ko ap apne post ya fir page main add karsakte hain.  (Related: How to add Disqus Comment system to blogger Blog)

Last Word

So friends apko a Tutorial kaisa laga Iske bare main comment main batana na bhule. Or agar apko is tutorial ko samjne me koie problem arha hain to Niche comment ke jariye poch sakte hain. 

Tuesday, 17 January 2017

5 Unique Custom Blogspot search box widgets

Internet pe Thousands blogs/websites hain, Apne kavi socha ki apka blog ko baki blog se kitna alag hain?Konsi chiz apke blog ko baki blog mese unique banate hain? Design ek aisa chiz hain jo sabse phele user ke samne Apke website ka Uniqueness define karta hain Or Fir apka Content dekha jata hain. Ham Bloggers hamesha apne Blog ko Baki blog se unique bana ne me tule hue hain. Aise me kuch cohta sa changes apke blog ko Dusre blog se Unique bana sakte hain. Or is ke liye  Ham apke liye 5 unique search box widgets leke aye hain Jo apke blog ko ek unique look deta hain Usike sath sath apke Impression vi increase kardeta hain.  Search box as a Search tools website me use hota hain. Dekha jaye to ap Wese Blogger ka Defult search Box widgets use karsakte hain but Jab har koie isko hi use karega to Uniqueness kaha jayega ?  Isliye dosto hamne 5 khub surat unique search box apke liye free me leke aye hain.

5 Unique Custom Blogspot search box widgets

Benefits of using search box widgets in Blog

Search box serf apke website ka design ko nehi balki wo uske jariye apke site visitors ko site ko browse karna or jyada asan ho jayega.Jo visitors apke site Regular visit karte hain wo agar kisi din kisi purana post ko search karne jaye to Ek search box unkeliye bohat kam ka hosakta hain or aise apka Visitors vi satisfied hota hain. 

Add Unique Custom Blogspot search widgets to Blogger


Agar ap apne Blog me search widgets add karna chate hain or apko design karna nehi ata hain to ap niche digaye 5 unique search widgets me se use karsakte hain.

Widgets No.1

Custom Blogspot search box widgets
Code for the Widgets

<style type="text/css">
<!-- Design by www.HindBlogger.in -->
#searchform {
display: inline-block;
zoom: 1; /* ie7 hack for display:inline-block */
*display: inline;
border: solid 1px #d2d2d2;
padding: 3px 5px;
-webkit-border-radius: 2em;
-moz-border-radius: 2em;
border-radius: 2em;
-webkit-box-shadow: 0 1px 0px rgba(0,0,0,.1);
-moz-box-shadow: 0 1px 0px rgba(0,0,0,.1);
box-shadow: 0 1px 0px rgba(0,0,0,.1);
background: #f1f1f1;
background: -webkit-gradient(linear, left top, left bottom, from(#fff), to(#ededed));
background: -moz-linear-gradient(top,  #fff,  #ededed);
filter:  progid:DXImageTransform.Microsoft.gradient(startColorstr='#ffffff', endColorstr='#ededed'); /* ie7 */
-ms-filter:  progid:DXImageTransform.Microsoft.gradient(startColorstr='#ffffff', endColorstr='#ededed'); /* ie8 */
}
#searchform input {
font: normal 12px/100% Arial, Helvetica, sans-serif;
}
#searchform #searchfield {
background: #fff;
padding: 6px 6px 6px 8px;
width: 130px;
border: solid 1px #bcbbbb;
outline: none;
-webkit-border-radius: 2em;
-moz-border-radius: 2em;
border-radius: 2em;
        -moz-box-shadow: inset 0 1px 2px rgba(0,0,0,.2);
-webkit-box-shadow: inset 0 1px 2px rgba(0,0,0,.2);
box-shadow: inset 0 1px 2px rgba(0,0,0,.2);}#searchform #searchbutton {
color: #fff;
border: solid 1px #494949;
font-size: 11px;
height: 27px;
text-shadow: 0 1px 1px rgba(0,0,0,.6);
-webkit-border-radius: 2em;
-moz-border-radius: 2em;
border-radius: 2em;
background: #5f5f5f;
background: -webkit-gradient(linear, left top, left bottom, from(#9e9e9e), to(#454545));
background: -moz-linear-gradient(top,  #9e9e9e,  #454545);
filter:  progid:DXImageTransform.Microsoft.gradient(startColorstr='#9e9e9e', endColorstr='#454545'); /* ie7 */
-ms-filter:  progid:DXImageTransform.Microsoft.gradient(startColorstr='#9e9e9e', endColorstr='#454545'); /* ie8 */
}
</style>
<form id="searchform" method="get" action="/search">
<input id="searchfield" name="q" type="text" placeholder="Type here..."  onfocus="if (this.value == 'Search...') {this.value = '';}" onblur="if (this.value == '') {this.value = 'Search...';}"/>
<input  id="searchbutton" type="submit" value="Search" /></form>

Widgets No.2

Custom Blogspot search box widgets
Code for the Widgets

<style>
<!-- Design by www.HindBlogger.in -->
#search-form {
background: #e1e1e1;
background: -webkit-gradient( linear,left top, left bottom, color-stop(0, rgb(243,243,243)), color-stop(1, rgb(225,225,225)));
background: -moz-linear-gradient( center top, rgb(243,243,243) 0%, rgb(225,225,225) 100%);
border-radius: 17px;
-webkit-border-radius: 17px;
-moz-border-radius: 17px;
box-shadow: 1px 1px 2px rgba(0,0,0,.3), 0 0 2px rgba(0,0,0,.3);
-webkit-box-shadow: 1px 1px 2px rgba(0,0,0,.3), 0 0 2px rgba(0,0,0,.3);
-moz-box-shadow: 1px 1px 2px rgba(0,0,0,.3), 0 0 2px rgba(0,0,0,.3);
}
input[type="text"]{
background: #fafafa;
background: -webkit-gradient( linear, left bottom, left top, color-stop(0, rgb(250,250,250)), color-stop(1, rgb(230,230,230)));
background: -moz-linear-gradient( center top, rgb(250,250,250) 0%, rgb(230,230,230) 100%);
border: 0;
border-bottom: 1px solid #fff;
border-right: 1px solid rgba(255,255,255,.8);
font-size: 16px;
margin: 4px;
padding: 5px;
width: 150px;
border-radius: 17px;
-webkit-border-radius: 17px;
-moz-border-radius: 17px;
box-shadow: -1px -1px 2px rgba(0,0,0,.3), 0 0 1px rgba(0,0,0,.2);
-webkit-box-shadow: -1px -1px 2px rgba(0,0,0,.3), 0 0 1px rgba(0,0,0,.2);
-moz-box-shadow: -1px -1px 2px rgba(0,0,0,.3), 0 0 1px rgba(0,0,0,.2);
}
input[type="text"]:focus{
outline: none;
background: #fff;
background: -webkit-gradient( linear, left bottom, left top, color-stop(0, rgb(255,255,255)), color-stop(1, rgb(235,235,235)));
background: -moz-linear-gradient( center top, rgb(255,255,255) 0%, rgb(235,235,235) 100%);
}
input[type="submit"]{
background: #44921f;
background: -webkit-gradient( linear, left top, left bottom, color-stop(0, rgb(79,188,32)), color-stop(0.15, rgb(73,157,34)), color-stop(0.88, rgb(62,135,28)), color-stop(1, rgb(49,114,21)));
background: -moz-linear-gradient( center top, rgb(79,188,32) 0%, rgb(73,157,34) 15%, rgb(62,135,28) 88%, rgb(49,114,21) 100%);
border: 0;
color: #eee;
cursor: pointer;
float: right;
font: 10px Arial, Helvetica, sans-serif;
font-weight: bold;
height: 30px;
margin: 4px 4px 0;
text-shadow: 0 -1px 0 rgba(0,0,0,.3);
width: 60px;
outline: none;
border-radius: 30px;
-webkit-border-radius: 30px;
-moz-border-radius: 30px;
box-shadow: -1px -1px 1px rgba(255,255,255,.5), 1px 1px 0 rgba(0,0,0,.4);
-moz-box-shadow: -1px -1px 1px rgba(255,255,255,.5), 1px 1px 0 rgba(0,0,0,.2);
-webkit-box-shadow: -1px -1px 1px rgba(255,255,255,.5), 1px 1px 0 rgba(0,0,0,.4);
}
input[type="submit"]:hover {
background: #4ea923;
background: -webkit-gradient( linear, left top, left bottom, color-stop(0, rgb(89,222,27)), color-stop(0.15, rgb(83,179,38)), color-stop(0.8, rgb(66,143,27)), color-stop(1, rgb(54,120,22)));
background: -moz-linear-gradient( center top, rgb(89,222,27) 0%, rgb(83,179,38) 15%, rgb(66,143,27) 80%, rgb(54,120,22) 100%);
}
input[type="submit"]:active {
background: #4ea923;
background: -webkit-gradient( linear, left bottom, left top, color-stop(0, rgb(89,222,27)), color-stop(0.15, rgb(83,179,38)), color-stop(0.8, rgb(66,143,27)), color-stop(1, rgb(54,120,22)));
background: -moz-linear-gradient( center bottom, rgb(89,222,27) 0%, rgb(83,179,38) 15%, rgb(66,143,27) 80%, rgb(54,120,22) 100%);
}</style>
<form id="search-form" method="get" action="/search">
  <input name="q" type="text" />
  <input type="submit" value="Search" />
</form>

Widgets No.3

Custom Blogspot search box widgets
Code for the Widgets

<style>
<!-- Design by www.HindBlogger.in -->
.form-container {
height: 49px;
padding: 0;
overflow: hidden;
text-align: left;
background: #f8f8f8;
border: 1px solid #ccc;
-moz-border-radius: 8px;
-webkit-border-radius: 8px;
border-radius: 8px;
-moz-box-shadow: 0 4px 0 #ddd, 0 6px 8px rgba(0,0,0,.5);
-webkit-box-shadow: 0 4px 0 #ddd, 0 6px 8px rgba(0,0,0,.5);
box-shadow: 0 4px 0 #ddd, 0 6px 8px rgba(0,0,0,.5);
}
.search-field {
float: left;
width: 190px;
height: 34px;
margin: 6px 0 0 8px;
padding: 0 8px;
font-family: 'Open Sans', Arial, sans-serif;
font-size: 16px;
color: #888;
font-style: italic;
font-weight: 400;
background: #fff;
border: 1px solid #ccc;
-moz-border-radius: 8px;
-webkit-border-radius: 8px;
border-radius: 8px;
background-image: -webkit-gradient(linear, left top, left bottom, from(#f5f5f5), to(#ffffff));
background-image: -webkit-linear-gradient(top, #f5f5f5, #ffffff);
background-image: -moz-linear-gradient(top, #f5f5f5, #ffffff);
background-image: -ms-linear-gradient(top, #f5f5f5, #ffffff);
background-image: -o-linear-gradient(top, #f5f5f5, #ffffff);
background-image: linear-gradient(top, #f5f5f5, #ffffff);
-moz-box-shadow: 0 1px 1px #e2e2e2 inset, 0 1px 0 #fff;
-webkit-box-shadow: 0 1px 1px #e2e2e2 inset, 0 1px 0 #fff;
box-shadow: 0 1px 1px #e2e2e2 inset, 0 1px 0 #fff;
}
.search-field:focus {
outline: 0;
color: #666;
border-color: #aaa;
-moz-box-shadow: 0 1px 1px #dadada inset;
-webkit-box-shadow: 0 1px 1px #dadada inset;
box-shadow: 0 1px 1px #dadada inset;
}
.submit-container {
float: left;
width: 50px;
height: 32px;
margin: 7px 0 0 7px;
padding: 0;
cursor: pointer;
background: #e63c0d;
border: 1px solid #d62700;
-moz-border-radius: 6px;
-webkit-border-radius: 6px;
border-radius: 6px;
background-image: -webkit-gradient(linear, left top, left bottom, from(#f55f15), to(#e63c0d));
background-image: -webkit-linear-gradient(top, #f55f15, #e63c0d);
background-image: -moz-linear-gradient(top, #f55f15, #e63c0d);
background-image: -ms-linear-gradient(top, #f55f15, #e63c0d);
background-image: -o-linear-gradient(top, #f55f15, #e63c0d);
background-image: linear-gradient(top, #f55f15, #e63c0d);
-moz-box-shadow: 0 1px 1px #fa8e1f inset, 0 1px 0 #fff;
-webkit-box-shadow: 0 1px 1px #fa8e1f inset, 0 1px 0 #fff;
box-shadow: 0 1px 1px #fa8e1f inset, 0 1px 0 #fff;
}
.submit-container:hover, .submit-container:focus {
background-image: -webkit-gradient(linear, left top, left bottom, from(#e63c0d), to(#f55f15));
background-image: -webkit-linear-gradient(top, #e63c0d, #f55f15);
background-image: -moz-linear-gradient(top, #e63c0d, #f55f15);
background-image: -ms-linear-gradient(top, #e63c0d, #f55f15);
background-image: -o-linear-gradient(top, #e63c0d, #f55f15);
background-image: linear-gradient(top, #e63c0d, #f55f15);
-moz-box-shadow: 0 1px 1px #f36215 inset, 0 1px 0 #fff;
-webkit-box-shadow: 0 1px 1px #f36215 inset, 0 1px 0 #fff;
box-shadow: 0 1px 1px #f36215 inset, 0 1px 0 #fff;
}
.submit-container:active {outline: 0;-moz-box-shadow: 0 1px 6px #e4340b inset;-webkit-box-shadow: 0 1px 6px #e4340b inset;box-shadow: 0 1px 6px #e4340b inset;}.submit {float: left;width: 60px;height: 32px;margin: 0;padding: 0;cursor: pointer;border: 0px solid #000;background: url(https://blogger.googleusercontent.com/img/b/R29vZ2xl/AVvXsEhB-j_00BKoxDYN2mMfWMe9tnKRszn19Wl6r2uSgarb4EDScGJJEWtsrUjxgk9wZNiXP3ZxVFH89K858_-hNKqw0eMFQ7j_NYEmgDStUgXnSphgwdfA9iV0LFEaLJRi9c0C9z0piJSml-0/s1600/magnifier.png) 20px 6px no-repeat;-moz-border-radius: 6px;-webkit-border-radius: 6px; border-radius: 6px;}</style>
<div id="search-form"><form class="form-container"  method="get" action="/search">
<input type="text" name="q" class="search-field" placeholder="Type search text here..." />
<div class="submit-container"><input type="submit" value="" class="submit" />
</div></form></div>

Widgets No.4

Custom Blogspot search box widgets
Code for the Widgets

<style>
<!--Design by www.HindBlogger.in -->
#search {
    -webkit-appearance: none;
    font-family: Helvetica Neue, Helvetica, Arial, sans-serif;
    width: 24px;
    padding: 0 10px;
    height: 24px;
    font-size: 14px;
    color: #666;
    line-height: 24px;
    border: 0;
    border-radius: 50px;
    box-shadow: 0 0 0 1px rgba(0,150,200,.5), inset 0 2px 5px rgba(0,100,150,.3), 0 2px 0 rgba(255,255,255,.6);
    position: relative;
    z-index: 5;
    -webkit-transition: .3s ease;
    -moz-transition: .3s ease;
}
#search:focus {
    outline: none;
    width: 180px;
}
p.s {
    z-index: 4;
    position: relative;
    padding: 5px;
    line-height: 0;
    border-radius: 100px;
    background: #b9ecfe;
    background-image: -webkit-linear-gradient(#dbf6ff,#b9ecfe);
    background-image: -moz-linear-gradient(#dbf6ff,#b9ecfe);
    display: inline-block;
    box-shadow: inset 0 1px 0 rgba(255,255,255,.6), 0 2px 5px rgba(0,100,150,.4);
}
p.s:hover {
    box-shadow: inset 0 1px 0 rgba(255,255,255,.6), 0 2px 3px 2px rgba(100,200,255,.5);
}
p.s:after {
    content: '';
    display: block;
    position: absolute;
    width: 5px;
    height: 20px;
    background: #b9ecfe;
    bottom: -10px;
    right: -3px;
    border-radius: 0 0 5px 5px;
    -webkit-transform: rotate(-45deg);
    -moz-transform: rotate(-45deg);
    box-shadow: inset 0 -1px 0 rgbA(255,255,255,.6), -2px 2px 2px rgba(0,100,150,.4);
}
p.s:hover:after {
    box-shadow: inset 0 -1px 0 rgba(255,255,255,.6), -2px 2px 2px 1px rgba(100,200,255,.5);
}
</style>
<form  method="get" action="/search">
<p class="s"><input name="q" id="search" type="text"></p>
</form>

Widgets No.5

Custom Blogspot search box widgets
Code for the Widgets

<style>
<!-- Design by www.HindBlogger.in -->
@import url(http://fonts.googleapis.com/css?family=Montserrat+Alternates);
.field {
  display:flex;
  position:realtive;
  margin:5em auto;
  flex-direction:row;
  box-shadow:
   1px 1px 0 rgb(22, 160, 133),
   2px 2px 0 rgb(22, 160, 133),
   3px 3px 0 rgb(22, 160, 133),
   4px 4px 0 rgb(22, 160, 133),
   5px 5px 0 rgb(22, 160, 133),
   6px 6px 0 rgb(22, 160, 133),
   7px 7px 0 rgb(22, 160, 133)
  ;
}
.field>input[type=text],
.field>button {
  display:block;
  font:1.2em 'Montserrat Alternates';
}
.field>input[type=text] {
  flex:1;
  padding:0.6em;
  border:0.2em solid rgb(26, 188, 156);
}
.field>button {
  padding:0.6em 0.8em;
  background-color:rgb(26, 188, 156);
  color:white;
  border:none;
}
</style>
<form method="get" action="/search">
<div class="field">
  <input type="text" name="q" id="searchterm" placeholder="what are you searching for?" />
  <button type="button" id="search">Find!</button>
</div>
 </form>
<script class="cssdeck" src="//cdnjs.cloudflare.com/ajax/libs/jquery/1.8.0/jquery.min.js"></script>

How to add Custom search box widgets to Blogspot blog

Step 1.  Login to your blogger account  Uske bad Layout me aye  >> “Add a gadget” Link par click kare jaha pe is widgets ko add karna cha rahe hain.

How to add Custom search box widgets to Blogspot blog

Step 2. Ab apke samne ek popup box khul jaye ga inmese “Html/Java Script” par click kare
Step 3. Paste any  Of thr above code. That’s it Guys easy na 😅.

Aur Padiye

Last Word 


So a tha Kuch 5 unique search box widgets. Ap in sare widgets ko free use karsakte hain. Or sare code me HTML tag ke andar ek Credit diyagya  hain Jisko ap edit nakare isse apke site ka koie nuksan nehi hoga or user dekhvi nehi payega. Umeed hain ki ap in widgets ko use kar parhe hain. Agar apke man koie vi doubt ya sawal hain to niche comment karke puch sakte hain. 

Monday, 16 January 2017

Blogger me Godaddy custom domain setup kaise kare

Hello Bloggers kaise hain ap sab? Jaise Jaise internet ka uses bad rahehe wase wase Internet meain Websites/Blogs vi badte jarahe hain . Aise me agar ap blogging me career bana na chate hain to apko Jo sabse peheli bat , Ek blog Cahiye Or uske bad Apko Chaiye ek Blog Ka name ya fir Ap domain Kehe sakte hain. Ek domain ek blog ka Phechan hota hain. Agar ap Ek achha Blog banana Cahate hain or Avi vi ap Ek Sub domain use karte hain to ap ka Impression audience ke samne Low hojata hain. So guys Aj is Article ki madhyam se janenge ki Kaise ap Blogger me godaddy custom domain Setup karsakte hain.

Blogger me Godaddy custom domain setup kaise kare

What is a Custom Domain?


Jab Ap Blogger me Blog banate hain to Uske sath apko ek aisa (domain.blogspot.com) domain blogspot domain Diya Jata hain jo ki Free main hota hain. Ek Custom domain wo hota hain Jis ko Ap buy karte ho kisi Domain Provider se(Godaddy) Jaise HindBlogger.in ek Custom domain hain.

Full Guide to Setup a Godaddy  Custom domain  to Blogger

First of all  ap Godaddy se ek Domain Buy karligiye ( Jo ki bohat asan hota hain).

Setting up Godaddy Custom Domain

Step 1. Login to your Blogger account
Step 2. Apna Blog select kijiye then Settings uske bad Basics par click kare. 
Step 3.  Ab Publishing Section ke niche “Setup a 3rd party URL for your blog” par click kare.

Blogger me Godaddy custom domain setup kaise kare

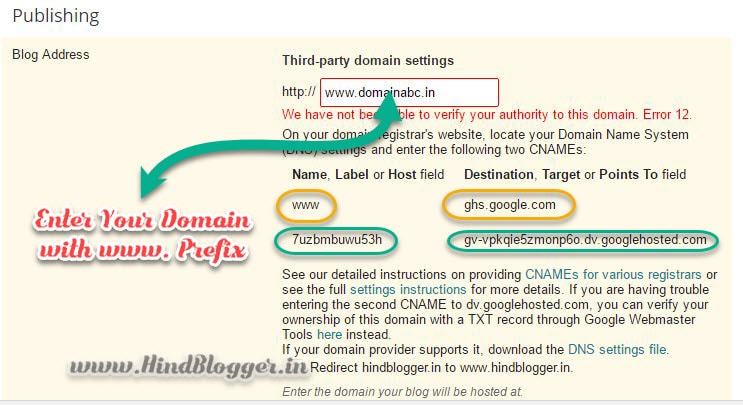
Step  4. Ab Blog address section me apna Domain enter kare www. Prefix ke sath. Agar apka domain hain hindblogger.in to ap enter kare www.hindblogger .in . Then apko Save me Click kardena hain. Ahapar apke samne ek Error (error:12) ayega or apko apna Domain authority verify keliye bola jayega. Op apko two code diya jayega Jisko apko copy karke Notepad me save karlena hain.

Blogger me Godaddy custom domain setup kaise kare

Step 5. Avi ap Browser me new tab me Godaddy ke site me jaye or Loging kare or top me apne user name par click kare then Manage my Domain par click kare.

Blogger me Godaddy custom domain setup kaise kare

Step 6. Ahapar apke samne Apke sare Godaddy  Registered custom domains  ajayega . Jisko apne blog me add karna chate hain uspe click kare.

Blogger me Godaddy custom domain setup kaise kare

Step 7. Ab Apko DNS Zone File  me Click karke Add Record par click karna hain.

Blogger me Godaddy custom domain setup kaise kare

Step 8. Aha pe apko Sabse phele Dropdown mese Cname Select karna hain. Then www host name digiye and apko Step 4 me jo ap www ke bad jo code tha usko point to field me enter karna hain then add another par click kardena hian.

Blogger me Godaddy custom domain setup kaise kare
Step 9.  Aha pevi apko cName select karna hain or step 4 me dusre columns me jo first code hain usko Host name ki jagha Paste kard or Jo dusra code hain usko Point to ke jagha paste karke finish karde.

Blogger me Godaddy custom domain setup kaise kare

Last Step A bap Blogger ke us Tab me wapas aye (Jis tab ne ham Step 4 complete kiya tha).  Redirect wale check box me tick karke Save wale button par click kare. So easy na 😉

Aur padiye


Last word


So friends is tutorial me Itnahi Umeed hain ki Ap Blogspot Domains ko Setup karna Sikh chuke hain . Or agar apke man me koie vi doubt wa fir sawal hain to ap niche comment karke puch sakte hain. Or Jude rahe hamare sath,Happy Blogging 😃.

Saturday, 10 December 2016

Top 5 Stylish Fashion Blogger Templates

Jaise jaise Internet ka uses increase ho raha hain, Waise waise hi Internet main blog/websites ka number vi Teji se Increase ho raha hain Or log Bohat sare categories main  Apna site/Blog bana rahe hain. Jisme se Ek Teji se Badte hua Category hain Fashion Blog. Aiseme agar ap  ek newbie  fashion blogger hain to apkeliye us Ek achha Fashion  Template Dhund pana bohat muskil sabit ho sakta hian. Is-Liye Apkeliyte hamne Internet se Top 5  Stylish Fashion blogger Template leke ayah u. To bina time waste kiye chaliye Nagar Dal te hain Templates ke upar.

Top 5 Stylish Fashion Blogger Templates
Note:-
Ham jab Apke liye Blogger Templates leke ate hain usko ham pehele Khud test karte hain or fir Uska code, layouts, Features, Page Loading Speed ko dekhte hain . Or Jo Jo templates Hamare Test Main Pass Hota hain ham serf Wo sare Template apkeliye leke ate hain.

1. ChicMag Fashion Blogger Template


Demo Download


Short Descriptions

Chic Mag Ek Bohat Hi achaa Light Blogger Template hain. Istemplate Ka page Speed kafi Achhi hain baki Fashion Template ki hisab se. Is Template me apko Niche digaye Features milta hain.

Features

  • Fully Responsive Design 
  • Fully SEO Optimized 
  • Mobile Friendly Design 
  • New - Mega Menu
  • Support Youtube thumbnail
  • Advance Search Engine Optimization
  • Random posts
  • Multiple comment system
  • Ads Ready
  • Auto Author Image
  • Newsletter Subscription
  • Custom Error 404 Page
  • Professional admin layout, help you easy work with blog layout.

2. Rosemary Blogger Template


Demo Download


Short Descriptions

Rosemy Ek Bohat Achaa Fashion Blogger Template hain Isme apko Featured Slider Milta hain. Aur Bohat Clean Layouts hain Jis-se apko Is Template ko Customize Karneme Asani Hongi.

Features

  • Fully Responsive Design
  • Advance Search Engine Optimization
  • Pin it button on images
  • Threaded Comment
  • Recent Post By Label
  • Ads Ready
  • Auto Author Image
  • Newsletter Subscription
  • Custom Error 404 Page
  • Minimalist style
  • Compatible with major browsers (IE8+,Mozilla,Chrome,Safari)
  • Professional admin layout, help you easy work with blog layout.

3. Modern Sidebar Blogger Template


Demo Download


Short Descriptions

Modern Sidebar White Full Clean Blogger Template hain Isme Apko Post Slider,About us,Social Buttons ki Tarha Unique Widgets Milta hain.

Features

  • Responsive Design
  • SEO Ready
  • 2 Slider Styles Layout/ Homepage (With & WIthout Sidebar) Styles
  • Featured Slider Styles
  • Fully Customizable( Font Style, Color Options & Homepage Style)
  • Youtube, Vine, Facebook, Instagram Embed Option
  • New Advanced MegaMenu with Dropdown Animation
  • Fixed Navigation Menu
  • Smooth Scrolling
  • Pinterest Widget
  • New Instagram Slider for footer and sidebar

4. CockTail Blogger Template


Demo Download


Short descriptions

Sora Template Ka Banya hua Is Template me Apko Responsive design Dekhne ko Milta hain Or iske sath sath a Template Bohat Hi Fast Loading Hain. Sora Templates Basically Bohat User Friendly templates Create karta hain. Aur is Template mevi apko Wo User Friendly Inter fess Dekhneko milega.

Features

  • Responsivee   
  • SEO Friendly
  • Google Testing Tool Validator   
  • Mobile Friendly  
  • Custom 404 Page  
  • Fast Loading    
  • Beauty Template   
  • Social Buttons   
  • Slider   
  • 3 Columns Footer   
  • Ads Ready   
  • Drop Down Menu   
  • Clean Layout   
  • Simple Design   
  • Browser Compatibility   

5. Rose Blog Blogger Template


Demo Download


Short Descriptions

Sabse Last me ata Hain Hamare Rose Blog Fashion blogger Template. Isko Banaya hian Sora Template Ne. Is-Template ka Design Bohat Minimal hain Aur Bohat Simple Design hain Joki bohat Achhi bat hain.

Features

  • Responsive  
  • SEO Friendly  
  • Google Testing Tool Validator  
  • Mobile Friendly  
  • Custom 404 Page  
  • Fast Loading 
  • Minimal
  • Fashion
  • Rosy
  • Ads Ready
  • Clean Layout
  • Simple Design
  • Drop Down Menu
  • Social Sharing
  • HTML5 & CSS3
  • Browser Compatibility

Read More

Last Word


So friends A tha Top 5 stylish Blogger Templates. Umeed hain ki is Article se apko Help mili hongi.
Agar Ap Ko Sach me Help Mila to Ap Is Article ko Apne Dosto Ke sath Share Karsakte hain. Aur Agar Apke Man Koie Sawal hain To Ap Jarur Comment Karke Hamse puch sakte hain. Thank You ;) Wish You Happy blogging 😃

Wednesday, 30 November 2016

Blog me Sliding related post widgets kaise add kare

Hi Bloggers,  In this Article ham sikhenge Ki kaise ap apne Blogger blog me Sliding Related post widgets ko add karsakte hain. Blogger par Is widgets ko add karke kya hota hain basically Apke har post, page par automatically Related post ka slide ajate hain Aur Iske ke jariye ap apne Blog ka views or jayada increase karsakte hain aur to aur apke blog is-se or jayda Professional  lagega. Is widgets ko takriban  sare professional Blogger use karte hain . Aur ham vi is widgets ko user kar rahehe kafi dino se. Ap is widgets ka live example dekh sakte hain hamare blog par hi. To bina time waste kiye Chaliye sikh lete hain. (Aur padiye: How to customize blogger scrollbar)

Blog me Sliding related post widgets kaise add kare

Blogger me Sliding Post widgets  add kaise and Ku kare ?

Wase to blog  me Sliding post widgets ko add karneka bohat sare Tadika hote hain. Par Is article par ham ek website ki madat se is Widgets ko add karenge Kuki mujhe Lagta hain A Sab se Asan tadika hain Is widgets ko add karneka . Main is site ke bare main batraha hu isliye ku ki Isme apke Blog ka Page slow nehi hoga. Jabki Agar ham Manually isko Java  scipt ya fir J Query ki madat   karne jaye to Hamare page speed Slow ho jata hain or Isse SEO par effect  padta hain. To ab chaliye janlete hain ki is widgets ko kaise add kare. Is widgets ko add karneke liye ap Niche digaye Steps ko follow kare.

Add Sliding Related Post Widgets to Blogger:

1. Sabse Phele Niche digaye Website par Jaye or Sign up karle.
https://www.addthis.com/register?next=/dashboard

2. Ab apko tools mese Related post wale button ko select karna hain.

3. Ab apke Samne ek new page open hoga Ahape apko Slider par click karna hain uske bad continue par click kare.

4. Ahape ap Apni Blog kee hisab se Is widgets ko customize karsakte hain. Or isko By Default vi chod sakte hain. Fir Save & Continue Button par click kare.

5. Ab Apko ek code Diya jayega ,usko copy kare
6. Ab Browser me New tab karke Blogger Dashboard me aye >> template>> edit HTML
7.Ctrl+F press karke </body> tag find kare or is Tag se pehele Us code ko Paste karde.
8. Click the Save Button. To easy na 😉.

Aur Padiye:

Last Word

So Friends A tha Blog me Sliding related post ko add karneka tadika. Umeed hain ki apko is article se help mili hogi. Is post ko ap apne baki Blogger Friends ke sath Share kare taki usevi pata chal sake ki kaise A sab hote hain. Agar Apke Man me koie sawal hain to ap niche comment karke mujse puch sakte hain. Thank you.

Tuesday, 29 November 2016

How to Customize Blogger Scrollbar

Hi Blogger, Aj ham janenge ki kaise blog scroll bar ko customize karte hai.Kya apne Kavi socha tha ki apne blog Ka Defult Scrollbar ko Apne manpasand Color Ya fer Template ki hisab se customize karsakte hain? Ap Example ki dor par hamare Blog ko dekh sakte hain. G- Bilkul ap aise karsakte hain Bas apko Aha par Kuch Step Follow karna padega.Is Tutorial ki jariye Ap apne blog Scrollbar ka Width, Color etc. Change Change karsakte hain. Is-se apke Blog or Jayada Colourful, Professional, Eye catchy  Lagega.  (Aur padiye: Blog me Sliding related post widgets kaise add kare)

How to Customize Blogger Scrollbar

Scrollbar ko Customize kaise kare:

Blog Scrollbar ka Defult Color hota hain GRAY or Style to ap dekhi sakte hain.But ham Blog ke scrollbar ko customize karsakte hain Uski Width, Height,Scrollbar trac kcolor, Track hover, Thumb color and thumb Hover color ko change karke.A sab karneke liye apko Apne blog Template ke
CSS sheet me kuch CSS code add karna padega. So without wasting time Chaliye Sikhte hain 😃

Follow These Step to Customize Your Blog Scrollbar:

1. Blogger me Login kare>> Go to Template >> Edit HTML
2. Ctrl+F press karke Niche digaye code ko find kare
]]></b:skin>

3.Or is Code se pehele ap Niche digaye Code ko paste karde


Code To Customize Blog Scrollbar

/*--------Scrollbar Customization by HindBlogger.in ---------*/
::-webkit-scrollbar {
width:8px;
height:8px;
}
::-webkit-scrollbar-track {
background:#FFF;  /*------A Scrollbar ke Background color ka code hain ------*/
-webkit-box-shadow:inset 1px 1px 2px #E0E0E0;
border:1px solid #D8D8D8;
}
::-webkit-scrollbar-thumb {
background:#009933;  /*------Thumb color ------*/
-webkit-box-shadow:inset 1px 1px 2px rgba(155,155,155,0.4);
}
::-webkit-scrollbar-thumb:hover {
-webkit-box-shadow:inset 1px 1px 10px rgba(0,0,0,0.4); /*------Shadow on hover------*/
}
::-webkit-scrollbar-thumb:active {
background:#333;   /*------Thumb color when it is active------*/
-webkit-box-shadow:inset 1px 1px 2px rgba(0,0,0,0.4);
}

4.Click the Save Button. Upar ke Css code me mene CSS comment tag apko batya ki ap is Code ke andar kaha change karsakte hain. or apne Hisab se Coloring karsakte hain. Ap  Highlighted Code jaga apne Blog ka Color code add karsakte hain ya isko Aisehi chod sakte hain.

 Last Word

So Friends a tha Blog Scrollbar ko Customize karneka Tutorial. Umeed hain Is Tutorial ke jariye apke blog ko Sundar bananeme Kamiyab honge. Agar apko Is css code ko Add karneme koie vi Problem aye to ap bas Niche Comment kare main Uska Jaldi Answer dene ki Qousis karunga. Thank you. Do Visiting Do Learning.

Monday, 26 September 2016

Blog Content copy Honese kaise roke

Friends Ham Bloggers ko hamesha Ek chij ka darr rehete hain wo hain Blog Content Copying. Jab ap Bohat Reasearch ke bat Ek Blog post likhte hain or agar ap Dekhe ki wo Blog Content kisi Dusrene copy kiya/Kar rehe hain to apko Badi ghussa hoga or apka Mhenat or Credit Koie Aur le raha hain to Obviously Apko gussa hona cahiye. Or kavi kavi A vi hota hain ki Apke Blog se Jo apke Blog Content copy kate hain usika post  Search engine me rank kar jata hain. Aiseme Ap apke samne ek Sawal ajata hain ki Ham apne Blog Content ko copy honese kaise rokhe?/ Ham apne Blog Content ko kaise Protect kare?.
Blog Content copy Honese kaise roke
Protect Your Blog content

Aj me apko Kuch Process Bataunga Jiske jariye ap apne Blog Content ko copy honese rok sakte hain. Apko Serf apne blog me 4-5 line ka ek Java Script/css Code add karna hoga Is-se kya hoga Jab koie banda apke Blog post ko Copy karneki kousis karega tab Selection kam nehi karega or Wo apke Blog Content ko copy nehi kar payega.


Blog Content copy honse kaise roke


Blog content ko copy honese rokne keliye Ham Two Types of Code ka Istemal karenge Ek Java Script or ek CSS. Ap inmese Kisi Ek Code ke jariye Apke Blog content ko Protect karsakte hain. But Fyda ahi hoga ki ap Css Use kare quki Css me apke page ka spees Down nehi hota jo ki Java script me thoda hota hin. Or Java Script me Koie banda Bohat asanise script ko Browser se Disable karke apke blog Content ko copy karsakte hain. Par Css me aisa nehi hota. Par ek bat hota hian na chori karne wala ko jitna vi Sabak do wo chorihi karege Agar koie Experienced Banda Kousis kare to wo apke blog  Content copy karsakte hain Par Mujhe nehi lagta koie itna mehenat karke kisi ka blog content copy karega.

Java script code ke jariye blog content ko protect kare. 

Ap Simply niche diye hue Java Script Code ke jariye apne Blog Content ko Copy Honse rok sakte hain.
How to add This code: Blogger Dashboard me aye>>Fir layout par click kare>>uske bad side bar me add new gadgets>> fir title ko blank rakhna hain or content me niche digaye code ko paste kardena hain.
<!—PROTECT YOUR BLOG CONTENT | WWW.HINDBLOGGER.IN -->

<script
src="demo-to-prevent-copy-paste-on-blogger_files/googleapis.js">
</script><br /><script type="text/javascript">
if (typeof document.onselectstart!="undefined" ) {
document.onselectstart=new Function ("return false" ); } else{
document.onmousedown=new Function ("return false" );
document.onmouseup=new Function ("return true" ); }
</script>
</!—end></!—start>

CSS ke jariye Blog Content ko protect kaise kare.

A kuch alag type ka Code hain Iske jariye apke Post me jo Blockquote weale section copy ho sakte hain Taki agar ap Apne Blog me Hamare trha HTML, CSS, Java script code share karte hain to apko a wala tricks use karna cahiye Taki apke user keliye jo  code ap Apne Blog Post me use kare usko copy karsake. How to add this code: Phele Blogger Dash bord me aye>>Template>>Edit Template >> backup(in case ap kuch galti karde)>>find  ]]></b:skin>. Jab apko A code mil jaye ga tab Ap niche digaye code ko ]]></b:skin> code se phele paste karde.


 /*----- Blog Content CSS protector | www.hindblogger.in----*/
.blockquote {
-webkit-user-select: text !important;
-moz-user-select: text !important;
-ms-user-select: text !important;
user-select: text !important;
}
body {
-webkit-user-select: none !important;
-moz-user-select: -moz-none !important;
-ms-user-select: none !important;
user-select: none !important;
}

Kuch jaruri bate: Agar apke Template me Blockquote tag alag ho for example .post blockquote, .post-body blockquote to a code apke blog me kam nehi vi karsakte hain. ai-se me ap pehel jan li ki apke blog template main Blockquote ke liye konsa tag use kiya he or us
tag ko uper di gaye css code me use kare.

Aur Padiye: 

So friends a tha Blog content copy honse rokne ka article. Agar apko a article pasand aya to ap isko Apne dosto ke sath Share kare. Agar apka koievi sawal haim to ap niche Comment kare Ham puri kusis karenge apke sawal ka jawab denaka. Is-tarha ka Article keliye Sty With us Jai Hind, Bande Mataram! 

Sunday, 18 September 2016

Blogger Blog Comment System ko Dofollow kaise kare?

Dear Hind Bloggers Kaise hain ap Sab. Apne aksar dekha hoga Wordpres Blog me jayada Comment ata hain Blogger Blog Comment ke tulna se. Apne kavi socha Asa Qu hota hain Qu Wordpress Blog me comment jayada hota hain?. Agar ap a Sawal kisiko vi karenge to uska Answer hoga Blogger Blog me Comment system Dofollow nehi hota hain. Ji dosto Aisahi log soch te hain par sachme kya aisa hota? Mera answer Ji nehi Ap agar Cahe to apni Blog me Comment system ko Dofollow karsakte hain. Or ap iske madat se Jaydase jayda Comment earn Karsakte hain. Ap badi asanise apke Blogger Blog me Comment system ko dofollow karsakte hain Bas apko Aha par Diya hua Kuch Steps Follow karna hoga.Or Is-se kya hoga Jab apke Blogger Blog me koi Visitors comment karega Use ek Dofollow Back link Miljayega Or aseme apka Blogger blog me vi Wordpress jaise Comments milne lagega. To cahaliye Dofollow comment ke bareme thoda or Details me Bat karte hain.
Blogger Blog Comment System ko Dofollow kaise kare?

DoFollow Tag ka Kam kya hain?

DoFollow ke Discuss karneke pehele Chaliye Janlete hain Nofollow Kay hain?

No Follow Ka matlab hota hain Jab Koi Visitors Apke Blog me Comment karte hain to uska Ek backlink bgantaa hain or Nofollow tag ke madatse Search Engine Us Back link ko Read nehi karpata or us Back link ko ignore karte hain. Or Jab ap apne Blog ko Dofollow karte hain to Iske matlab hain Apke Blog me Jo Vistors Comment Karga Uska Ek Back link Create hota hain or us Dofollow tag se Searc Engine(Google, Yahoo) ko pata Chalta hain ki a ek Back link hain.

Kya Dofollow comments fydemand hain?

Jaise mene Phelevi kha hai Visitors Jab apke Dofollow Blog me Comment karegta To usko ek Backlink milega or Jo visitors Apke Blog me Comment kiya Uska Off-page SEO me Madat ho jayega or apka Traffic vi increase Ho jayega. Ji ha Dosto Dofollow Comment Faydemand hain Par jaise Har medicine ka Side effect hota hain waise Dofollow comment kavi Thoda Side effect hain Jiasa Dofollow Comments me apka Spam Comment Increase Ho sakte hain. Bas apko har  Ek
Comment ko check karna Padega. Agar ap aisa karte hain to Apka Dofollow Comment system Ekdum Side effect Free hain. Aha Niche Mene Dofollow Comments ka Advantage or Disadvantage ke bare main ek List hain Dekhlijiye.

Advantage Of DoFollow Comment System

  • Dofollow comments ke madat se ap ke Blog me Traffic Increase hoga.
  • Visitors Dofollow comment Wala Blog ko jayda Like karte hain.. 
  • It will your page rank on Search engine.[Agar ap ke blog me quality Post ho to]

Disadvantage of DoFollow comment

  • Apke Blog me Spammy comment jayada ho jayenge.
  • Comment Modarat karneme apka extra time dena padega.
  • Apke Bold link me link Juice Mixed ho jasakta hain.

Blogger Blog Comment System ko Dofollow kaise kare?

To dosto Ap Dofollow Comment System ke bare main ab bohat kuch jan gaye hain. Ap apvi Interested hain is Bat ko leke ki Kaise Blogger Blog Comment system ko Dofollow kare. To chaliye Jan lete hain.

Blogger Blog Comment System ko Dofollow kaise kare?


 First of all Apne Blogger Dashbord me jaye fir Template wale option par click kare uske bad edit template par click kare  or Niche Di gaye HTML code ko find kare (Ctrl+f).

<a expr:href='data:comment.authorUrl' rel='nofollow'><data:comment.author/></a>

Jab apko a mil jaye ga Tab apko Is-me se rel='nofollow' ko remove karna hain. Fir Save Template par click karna hain. Thats all. Tha na Asan Tutorial :)!

Aur Padiye:

To dosto A tha Blogger Blog Comment System ko Dofollow karne ka Article Umeed hain ki apko a Article pasand aya hoga. Pasand ane pe ap is Article ko Apne Blogger Dosto ke sath Social media Par Share karsakte hain. Agar apke man me Koi Swal ho to Apke liye hamare Dofollow Comment Box Hazir hain Ap Apne sawal ham Comment karsakte hain ham Puri Kosis karenge apke Sawal ka Jawab dene ka.Is-Trha or Itresting Article keliye Sty with us Jai Hind, Bande Mataram!